macOS Sonoma is not all about new features but some new bugs. Well, jokes aside, some serious issues have been bugging the users after they installed the latest macOS update. Some users reported that they started facing Wi-Fi issues after they installed the latest macOS Sonoma Wi-Fi update.
From all the user complaints, it can be concluded that the Wi-Fi issues on the macOS Sonoma update is the major one. You might be unable to connect to Wi-Fi or experience slow internet after the update. Let’s go through all the troubleshooting methods to help you fix macOS Sonoma Wi-Fi issues.

Fix WiFi Not Working After MacOS Sonoma Update?
There are some preliminary steps that you must follow before we continue ahead with the article. This is to ensure that there are no issues with your router. Here’s what you can do-
- Try connecting your Mac to some other Wi-Fi network. If the issue is not encountered, there’s some issue with your Wi-Fi.
- Check the same Wi-Fi network with some other device. If the Wi-Fi connects to some other device and shows no issue, then there’s some issue with your Mac, and we will be troubleshooting it ahead in this article.
- Try moving your router (or mobile hotspot) device close to your Mac. Try switching between 2.4GHz and 5GHz bands and see if that solves the issue.
- You can also try restarting your Wi-Fi (or mobile hotspot) and then connect to it again. Check if the issue is still encountered or not.
- Disconnect all the third-party accessories/peripherals connected to your Mac, and then try using Wi-Fi again.
- If you are facing issues with a particular application, you can try restarting that app, and the issue should be resolved.
How to Fix macOS 14 Sonoma WiFi Problems 2024
If you have tried the above preliminary fixes, but they don’t seem to resolve the issue, then here’s what you can do next-
1. Restart Your Mac
First thing first, try restarting your Mac. Sometimes, there can be glitches that can cause issues with the Wi-Fi network. Try restarting your Mac, then reconnect to the Wi-Fi.
- Open the Apple Menu and then click on Restart.

- Click on Restart in the pop-up Window to reboot your Mac.

- After the restart, connect to the Wi-Fi again and see if it solves the issue.
2. Disable and Re-Enable Wi-Fi
The next thing you can do is disable and re-enable the Wi-Fi. This should most probably solve the issue that t you have been facing. Below are the steps to do so-
- Click on the Wi-Fi icon at the top bar, and then turn off the Wi-Fi toggle.

- Wait a few seconds and then re-enable the Wi-Fi toggle.
3. Turn Off the Mac Firewall
Sometimes, the Mac firewall can also cause this issue. Try turning off the Mac firewall to see if the issue is resolved. You can do it by following the steps given below-
- Open the Spotlight search with the Command + Spacebar shortcut. Now, type System Settings and press Enter.
- On the left pane, click on Network and then click on Firewall.
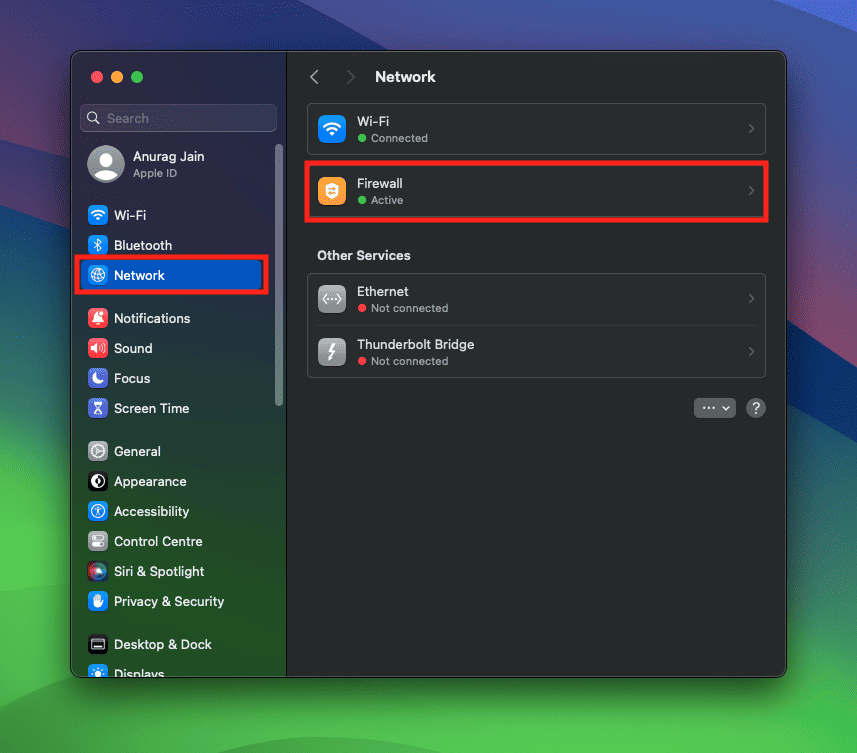
- Now, turn off the toggle next to Firewall.

- See if it fixes the issue; if not, you can turn it back on.
4. Re-Add Network
Another thing that you can do is delete the old network that you were connected to and then re-add it to your Mac. You can do it by following the steps given below-
- On the top bar, click on the Wi-Fi icon and then click on Wi-Fi Settings.
- Under the Known Network, you will see all the networks that you have connected previously on Mac. Click on the three dots next to the network you want to forget, then click on Forget this network.

- You will get a pop-up asking you to confirm forgetting the network; click Remove to continue.

- Now, on the same Wi-Fi settings window, you will see the network you just removed. Click on the Connect button next to it.

- You will have to enter your password to connect. Once done, check if the issue is fixed or not.
5. Turn Off Bluetooth
You must check if the Bluetooth is causing the issue. Turn off Bluetooth and then reconnect to the Wi-Fi network. If the Wi-Fi works fine after this, then the issue was caused by Bluetooth.
- Open the Control Centre on Mac by clicking on the Control Centre at the top bar.
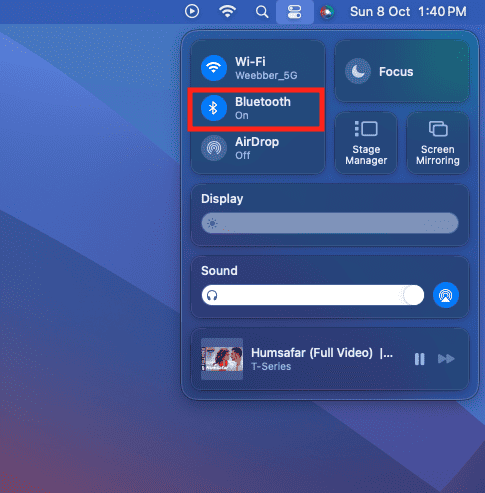
- Now, click on the Bluetooth option.

- Next, turn off the toggle next to Bluetooth to turn it off.
6. Run Wireless Diagnostic
If you have trouble connecting to the Wi-Fi, try running the Wireless Diagnostic. This will verify your network and solve any issues you face with the Mac. You can follow the steps given below to run the wireless diagnostic-
- Use the Command + Spacebar shortcut to launch the Spotlight Search. In the Spotlight search, type Wireless Diagnostics and press Enter.
- Click on Continue in the Wireless Diagnostic window to continue ahead.

- Now, follow the on-screen instructions to run Wireless Diagnostics.

7. Renew DHCP Lease
Renewing DHCP Lease will assign you a new IP address and the subnet mask. Doing so should fix the Wi-Fi issues that you are facing with the current network you are connected to. You can do this by following the steps given below-
- Launch the System Settings on your Mac.
- Click on the Network on the left pane and then on Wi-Fi.

- Next, click on the Details button.

- Now, click on TCP/IP and then click Renew DHCP Lease.

8. Reset Mac
If nothing seems to help and you are still stuck with this issue on your Mac, then as a last resort, you can try resetting your Mac. Take a backup of your Mac and then continue with this method. You can do it by following the steps given below-
- Open the System Settings.
- Under the General tab, click on Transfer or Reset.

- Now, click on Erase All Content and Settings.

- Follow the instructions you see on the screen to successfully reset your Mac.
Note- If you use a Macbook, ensure it is fully charged. It would be better to connect it to a power source while resetting it.
Bottom Line
It’s unfortunate to be stuck with Wi-Fi issues after the macOS update. If you cannot connect to the Wi-Fi network, check with the ethernet cable (on a supported Mac) or use USB tethering via your mobile. If that doesn’t solve the macOS Sonoma Wi-Fi issues, contact Apple Support for further assistance.
READ MORE: