In Short Hacks: Android devices provide a huge scope for customization. Almost every detail of an Android device can be customized using one or the other method. So here we are going to reveal How to Install and Flash Custom ROMs On Android and also share some key factors om How-To Install it safely and which Custom ROMs is best for your device.

There are many instances where you might not be quite happy with the stock ROM which is provided to you by the manufacturer or you might be bored of using the same ROM for a long time now. Whatever the situation might be, the solution is to install a new ROM on your Android device. You can choose the perfect ROM for your Android device from a huge collection of ROMs.
Every ROM provides with the best features which it is loaded with for your Android device. Here, we are going to give you the steps which you need to know for installing a ROM on your Android device. Before you start with any of the steps listed below, make sure that your Android device is rooted. If your Android device is not rooted, you can check how to root your Android device from our previous articles and if you do not wish to root your Android device, do not follow any of the steps listed below.
What is ROM?
“ROM” stands for “Read-Only Memory.” A custom android ROM replaces your device’s Android operating system, Normally stored in read-only memory with a new version of the Android operating system. Custom ROMs are different from acquiring root access.
3 Reasons To Install Custom ROMs?
- Get The Latest Version of Android
- Quick Android Updates
- New Look and Performance Enhancement.
Also Read: How To Display CPU Frequency In The Status Bar (Working)
How To Install/Flash Custom ROM On Rooted and Non-Rooted Android Devices
Note: In this process, you can use any ROM installers. Here, we are using the ‘TWRP‘ for flashing the custom ROM. you can easily get this app on the play store. But if you face any trouble while using this app, we recommend you to try ROM Manager Installer.
Download “TWRP Recovery” For Rooted Android:
[appbox googleplay me.twrp.twrpapp&hl=en]5 Easy Steps To Install Custom ROMs On Android (Rooted) 2017
To make this task more secure and safe, we strictly recommend you to take backup of your all data along with current ROM installed on your device. To make this process simpler, here we have suggested you some best backup apps that let you help in “Backup Process.”
Best Backup Apps For Android To Secure Your Data

- Super Backup And Restore [appbox googleplay com.idea.backup.smscontacts&hl=en]
- App Backup Restore Transfer [appbox googleplay mobi.infolife.appbackup&hl=de]
- Titanium Backup [appbox googleplay com.keramidas.TitaniumBackup&hl=en]
Step 1: Download an Appropriate ROM
Search and download the best ROM for your Android device and preferably store it in your sd card with an extension of ‘.zip‘. Check our old post where we have mentioned top 12 best Custom ROMs For Your Android. Make sure that you choose the correct ROM which is compatible with your Android device.
Step 2: Go into Recovery Mode
Use the button combination of your device to enter the recovery mode which is generally by holding the volume down and power button simultaneously for 5 seconds. You can check the key combinations for your device on Google.
- If your phone is on, turn it off.
- Press and hold the Volume up button and the Power button at the same time until the device turns on.
- Press the Volume down button to select “Recovery mode.“
Step 3: Install your Custom ROM
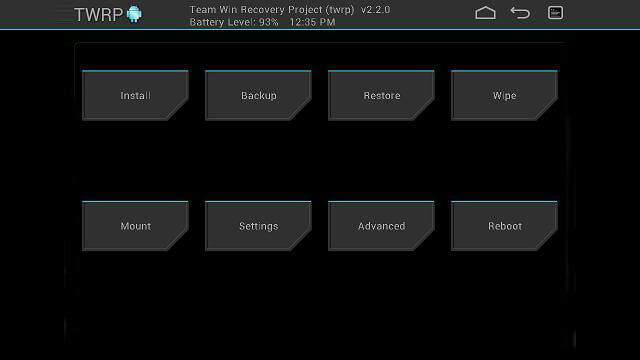
Here, you will find an option which reads ‘Install‘ click on it. Then, select the location where you have saved the downloaded custom ROM with a zip extension, such as sd card, internal storage.
Step 4: Confirming the Flash
Once you are done with selecting the proper file, you can flash the zip file which contains your custom ROM. For this, you will have to confirm the flash.
Step 5: Clear Cache
As the installation process is completed, clear all the cache. For this, you have to select the ‘wipe data / reset‘ option. Finally, confirm the clearing process to get rid of all the cache memory.So that you won’t face any issue further.
What Happen If you Lose Your Data?
Relax! It might happen that sometimes you may lose your data or installation process won’t be executed properly. So in that case, as we mentioned above “Don’t Forget To Take Backup.” The only way to restore your phone data back is Backup. For this You need to do is open your custom recovery Clockworkmod or ROM Manager or TWRP Recovery and Restore the backup file from your SD Card. This will make your Device as older it was.
Remember (Step 2), During installing of your custom ROM on your device will make the factory reset and all your apps will get deleted and have to restore all that using the backup file of titanium backup or any other app that you had used to backup, that you had made in the 2nd step.
Also Read: How To See Saved Wifi Passwords On Android (ROOT)
Now it’s Your Turn? The above-listed method is the easiest way in which one could flash/install a custom ROM on the Android device. There are some more methods which will do the same task for you but, according to us, this is the best and the worst possible way to install or fish a custom ROM on an Android device. If you are stuck at any of the steps or if you find any better and easier method then, please let us know in the comments section below, we will try our best to do the needful.