LSA protection or Local Security Authority Protection is required in Windows to keep user credentials safe from hackers trying to get them. This security protects all the essential information and not only your credentials. This prevents unsigned drivers and plugins from loading into the local security authority.
When this feature is turned off on your PC, you will get the “Location Security Protection is Off” error message on your PC. So what causes this issue, and how can it be fixed? If you have been looking for the answer, then this article will help you with that. We will be listing all the ways by which you can fix Local Security Authority Protection is off on Windows 11.

Why Am I Getting Local Security Authority Protection Is Off Error Message?
You will get this error message when Local Security Authority Protection is turned off on Windows 11. It can get turned off automatically due to the following reasons-
- It gets turned off when the secure boot is turned off.
- Another reason behind it could be changes in the Group Policy or Registry. If some program or services have tweaked the Group Policy or the Registry, then that could turn off the LSA protection.
- A corrupted update installed on your PC can cause LSA protection to get turned off.
Fix Local Security Authority Protection Is Off On Windows 11
If you get the Local Security Authority Protection is off error on Windows 11, you must manually turn on the LSA protection settings. You can do this from the Windows Security application, Registry Editor, or Group Policy Editor.
Through Windows Security
The first way to turn on Local Security Protection is through the Windows Security app. Given below are the steps to do so-
- Open the Start Menu on your Windows PC by pressing the Windows key. Here, type Windows Security and press Enter to open it.

- On the left sidebar, click on the Device Security option.

- Click the Core Isolation Details option under the Core Isolation section on the right side.

- You will see a toggle for Local Security Authority Protection; turn it on.
- On the UAC prompt that opens up, click on Yes.
- You will now be asked to restart your PC. Reboot your PC, and LSA protection will be turned on.
Through Registry Editor
- Press Windows + R key combo to open the Run dialog box.
- In the Run dialog box, type regedit and press Enter. You will get the UAC prompt; click Yes to open Registry Editor.

- Click on the address bar at the top of the Registry Editor, copy and paste the address given below and press Enter.
- Computer\HKEY_LOCAL_MACHINE\SYSTEM\CurrentControlSet\Control\Lsa
- On the right side, double-click on the RunAsPPL to edit it. If you don’t find the RunAsPPL key, here’s what you can do-
- Right-click on the Lsa on the left pane.
- From the menu, click on New and then on DWORD (32-bit) Value.

-
- Rename the DWORD Value as RunAsPPL.
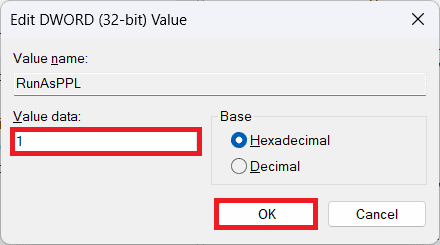
- Now, double-click on the RunAsPPL to edit it.
- Set the Value Data as 1 and click on OK.
- Similarly, edit the RunAsPPLBoot and set its value data to 1. If you don’t find the RunAsPPLBoot, you can create it as we did earlier for RunAsPPLBoot.
- After making these Registry Changes, restart your PC. It will save the changes you have made.
Through Group Policy Editor
You can also enable the Local Security Authority Protection feature on your Windows PC through the Group Policy Editor. You need Windows 11 Pro to use Group Policy Editor; it won’t work on Windows 11 Home version. Given below are the steps to enable Local Security Authority Protection through Group Policy Editor-
- Click on the Start icon on the taskbar to open Start Menu. Type Group Policy Editor and press Enter.
- Navigate to the following address in the Group Policy Editor-
- Computer Configuration\Administrative Templates\System\Local Security Authority
- On the right side, look for Configure LSASS to run as a protected process. Double-click on it to edit it.
- Select the Enabled option.
- Under the Options section, you will see the drop-down menu with Configure LSA to run as a protected process written at the top. Click on this drop-down menu, and select Enabled with UEFI Lock.
- Click on Apply and then on OK.
- Once done, restart your PC, and the changes will be made.
Conclusion
The above ways should enable the Local Security Authority Protection on your Windows PC. Once you have manually turned on the LSA protection, you won’t face Local Security Authority Protection is off on Windows 11.
ALSO READ: